How to Maximize Email Deliverability with Sendinblue
Email marketing is a powerful tool, but its effectiveness hinges on deliverability. If your emails consistently land in the spam folder, your efforts are wasted. This article delves into practical strategies for optimizing email deliverability with Sendinblue, ensuring your messages reach your subscribers’ inboxes. We’ll cover authentication, list management, content optimization, and monitoring techniques to improve your sender reputation and boost engagement.
Table of Contents:
- Email Authentication: Setting Up SPF, DKIM, and DMARC
- List Management: Building and Maintaining a Healthy Email List
- Content Optimization: Crafting Engaging and Deliverable Emails
- Monitoring and Reporting: Tracking Your Deliverability Performance
Email Authentication: Setting Up SPF, DKIM, and DMARC

Email authentication is the foundation of good deliverability. It verifies that the emails you send are genuinely from your domain, preventing spammers from spoofing your address and damaging your sender reputation. Sendinblue provides tools to set up SPF, DKIM, and DMARC records, which are crucial for authenticating your emails and building trust with email providers like Gmail, Yahoo, and Outlook.
Setting Up SPF (Sender Policy Framework)
SPF specifies which mail servers are authorized to send emails on behalf of your domain. To configure SPF, you need to add a TXT record to your domain’s DNS settings. This record lists the IP addresses or domains that are permitted to send emails from your domain. Without SPF, receiving mail servers have no way to verify if an email purportedly from your domain is actually sent from your domain or a malicious source.
Example:
v=spf1 include:spf.sendinblue.com -allExplanation:
v=spf1: Specifies the SPF version being used.include:spf.sendinblue.com: Includes Sendinblue’s SPF records, authorizing their servers to send emails on your behalf. This is crucial when using Sendinblue for sending.-all: Specifies that any server not explicitly listed in the SPF record is not authorized to send emails from your domain. This provides a “hard fail,” meaning emails failing the SPF check are more likely to be rejected. A softer approach is~all, which indicates a “soft fail,” potentially flagging emails as suspicious but still delivering them. The-allis generally recommended for better security.
Practical Example:
Let’s say your domain is `example.com` and you use Sendinblue for email marketing. You also have a server on your own network with IP address `203.0.113.45` that sends transactional emails (e.g., order confirmations). Your SPF record would be:
v=spf1 ip4:203.0.113.45 include:spf.sendinblue.com -allThis record authorizes both your server (`203.0.113.45`) and Sendinblue’s servers to send emails from `example.com`.
Setting Up DKIM (DomainKeys Identified Mail)
DKIM adds a digital signature to your emails, which receiving servers can use to verify that the email hasn’t been tampered with during transit. Sendinblue generates a DKIM key pair (a public key and a private key). You add the public key as a TXT record to your DNS, and Sendinblue uses the private key to sign your emails.
Example:
Sendinblue provides a DKIM record that looks similar to this:
s1._domainkey.yourdomain.com. IN TXT "v=DKIM1; k=rsa; p=MIIBIjANBgkqhkiG9w0BAQEFAAOCAQ8AMIIBCgKCAQEAyPjhkK8J9...\etc...\f4W9fJ/v9wIDAQAB;"Explanation:
s1._domainkey.yourdomain.com: The selector (s1in this case) and the domain name. Sendinblue usually provides a selector.IN TXT: Indicates this is a TXT record.v=DKIM1;: Specifies the DKIM version.k=rsa;: Specifies the key type (RSA).p=MIIBIjANBgkqhkiG9w0BAQEFAAOCAQ8AMIIBCgKCAQEAyPjhkK8J9...\etc...\f4W9fJ/v9wIDAQAB;: The public key. This is a very long string.
Practical Example:
In your DNS management console (e.g., GoDaddy, Cloudflare), create a new TXT record. Use the hostname `s1._domainkey.example.com` (replace `example.com` with your actual domain). Copy the entire value (the string starting with “v=DKIM1;”) provided by Sendinblue into the TXT record’s “value” field. This crucial step links your domain to Sendinblue’s DKIM signing process.
Setting Up DMARC (Domain-based Message Authentication, Reporting & Conformance)
DMARC builds upon SPF and DKIM by specifying what receiving servers should do if an email fails SPF and/or DKIM checks. It also allows you to receive reports about email authentication failures, giving you visibility into potential spoofing attempts. DMARC tells recipient mail servers how to handle emails that fail SPF and DKIM: `none`, `quarantine`, or `reject`.
Example:
_dmarc.yourdomain.com. IN TXT "v=DMARC1; p=none; rua=mailto:dmarc-reports@yourdomain.com; ruf=mailto:dmarc-reports@yourdomain.com; adkim=r; aspf=r;"Explanation:
_dmarc.yourdomain.com: The DMARC record name.v=DMARC1;: Specifies the DMARC version.p=none;: Specifies the policy.nonemeans no action is taken if an email fails authentication. This is recommended initially for monitoring.quarantinemeans the email should be marked as spam.rejectmeans the email should be rejected outright.rua=mailto:dmarc-reports@yourdomain.com;: Specifies the email address to which aggregate reports should be sent. These reports provide summaries of authentication results.ruf=mailto:dmarc-reports@yourdomain.com;: Specifies the email address to which forensic reports (failure reports) should be sent. These provide detailed information about individual authentication failures.adkim=r; aspf=r;: These specify alignment modes for DKIM and SPF. ‘r’ means relaxed alignment, allowing subdomain matching. ‘s’ means strict alignment, requiring an exact domain match.
Practical Example:
Start with a `p=none` policy to monitor your email authentication results without affecting deliverability. Create an email address like `dmarc-reports@example.com` to receive DMARC reports. After reviewing the reports and ensuring your SPF and DKIM are correctly configured, you can gradually increase the policy to `p=quarantine` and then `p=reject` for maximum protection against spoofing.
Important Note: After configuring SPF, DKIM, and DMARC, use online tools like Mail-Tester to verify that your email authentication is set up correctly. This helps to catch configuration errors early on.
List Management: Building and Maintaining a Healthy Email List

Even with perfect email authentication, a poorly managed email list can severely damage your deliverability. Email providers closely monitor engagement metrics, such as open rates, click-through rates, and bounce rates. A list full of inactive or invalid email addresses signals to providers that you’re not sending relevant content, which can lead to your emails being filtered as spam. Effective list management involves acquiring subscribers ethically, segmenting your audience, and regularly cleaning your list.
Ethical List Acquisition: Opt-in is Key
Never purchase email lists. These lists are often outdated, contain spam traps, and are unlikely to contain subscribers who are genuinely interested in your content. Instead, focus on building your list organically through opt-in methods. This means requiring subscribers to explicitly consent to receive emails from you. Double opt-in, where subscribers confirm their subscription via a confirmation email, is highly recommended for ensuring high-quality leads.
Example:
Create a signup form on your website offering a valuable incentive, such as a free ebook, a discount code, or exclusive content, in exchange for subscribing to your email list. Use Sendinblue’s subscription form builder to create visually appealing and effective signup forms.
Practical Example:
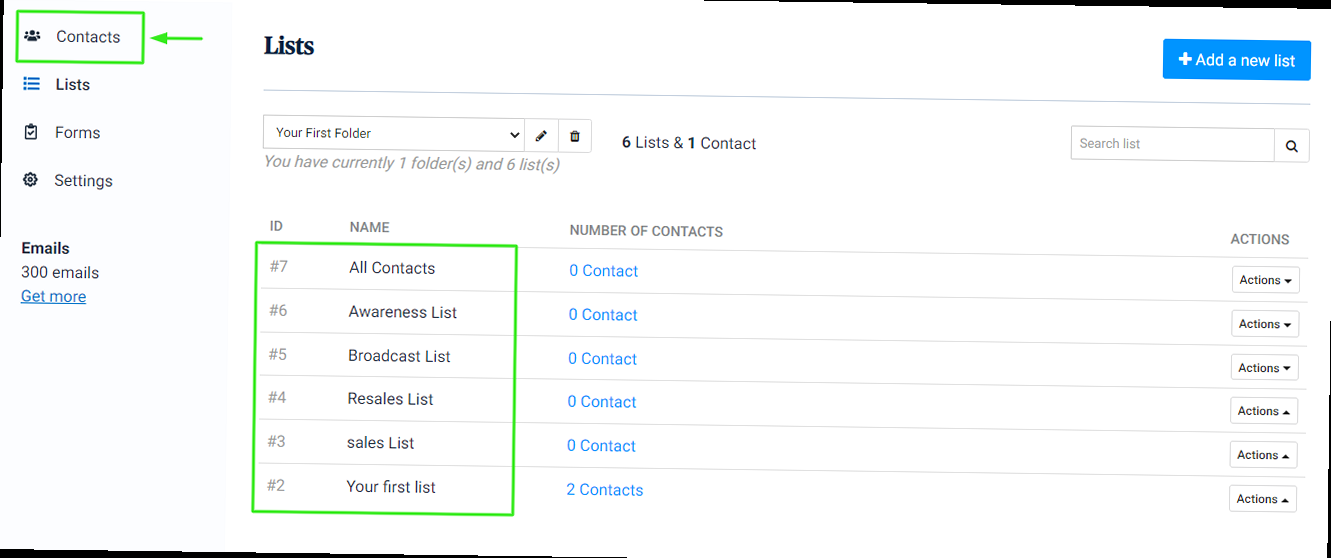
Within Sendinblue, navigate to “Contacts” -> “Forms”. Create a new form with fields for “Email” and “Name”. Add a checkbox with clear text like “Yes, I would like to receive email updates and exclusive offers from example.com.” Enable the “Double Opt-in” option. Embed this form on your website’s homepage and relevant landing pages.
Segmentation: Targeting Your Audience
Segmentation involves dividing your email list into smaller groups based on demographics, interests, purchase history, or engagement behavior. This allows you to send more targeted and relevant emails, which improves open rates, click-through rates, and overall engagement. Sendinblue offers powerful segmentation tools that allow you to create segments based on various criteria.
Example:
Segment your email list based on purchase history. Send special offers to customers who have purchased a specific product or category of products. Alternatively, segment based on location to send geographically relevant promotions.
Practical Example:
In Sendinblue, navigate to “Contacts” -> “Segments”. Create a new segment called “Customers who purchased Product X”. Set the criteria to include contacts who have a “Purchase History” attribute containing “Product X”. You can then send a targeted email campaign promoting related products to this segment.
List Cleaning: Removing Inactive Subscribers
Regularly clean your email list to remove inactive subscribers, bounced email addresses, and spam traps. Inactive subscribers are those who haven’t opened or clicked on your emails in a significant period of time (e.g., 6 months or a year). Sendinblue automatically handles bounced email addresses, but you should also proactively identify and remove inactive subscribers to maintain a healthy list. Sending to inactive emails hurts your sender reputation.
Example:
Create a segment of subscribers who haven’t opened an email in the past 6 months. Send a re-engagement campaign to these subscribers, offering them a special incentive to stay subscribed. If they still don’t engage, remove them from your list.
Practical Example:
In Sendinblue, navigate to “Contacts” -> “Segments”. Create a segment called “Inactive Subscribers (6 Months)”. Set the criteria to “Last Activity” “before” “6 months ago”. Send a targeted campaign with a subject line like “Still want to hear from us? Get a special discount!” If subscribers don’t open this email or click on any links within it, use Sendinblue’s list management tools to unsubscribe them.
Expert Tip: Implement a sunset policy for your email list. Define a specific timeframe after which inactive subscribers are automatically unsubscribed. This helps maintain a clean and engaged list, boosting your sender reputation.
Content Optimization: Crafting Engaging and Deliverable Emails
The content of your emails plays a crucial role in deliverability. Email providers analyze the subject line, body text, links, and images to determine whether an email is likely to be spam. Optimizing your email content involves crafting engaging and relevant messages that avoid spam triggers and provide value to your subscribers. This includes careful subject line creation, avoiding excessive use of spam trigger words, and ensuring your emails are mobile-friendly.
Subject Line Optimization
Your subject line is the first impression your email makes. It should be concise, compelling, and accurately reflect the content of the email. Avoid using all caps, excessive punctuation, or misleading language, as these are common spam triggers.
Example:
- Bad: URGENT!!! FREE MONEY!!!
- Good: Exclusive Discount: 20% Off Your Next Order
Practical Example:
Use Sendinblue’s A/B testing feature to test different subject lines and see which ones perform best. For example, test a subject line that focuses on a specific benefit versus one that creates a sense of urgency.
In Sendinblue, when creating a campaign, you have the option to create an A/B test. Set up two versions of your campaign, each with a different subject line. Sendinblue will automatically send each version to a portion of your list and track the open rates to determine the winning subject line.
Avoiding Spam Trigger Words
Certain words and phrases are commonly associated with spam and can trigger spam filters. Avoid using these words in your subject lines and body text. Examples include “free,” “guarantee,” “urgent,” “cash,” “credit,” and “opportunity.” A quick online search can provide a more extensive list of spam trigger words.
Example:
- Instead of: Get a free gift today!
- Try: Enjoy a complimentary gift with your purchase.
Practical Example:
Before sending an email campaign in Sendinblue, use a spam checker tool to analyze your content for potential spam triggers. While Sendinblue doesn’t have a built-in spam checker, you can use external tools like Mail-Tester or SpamAssassin to evaluate your email’s spam score.
Copy the HTML source code of your email from Sendinblue’s editor and paste it into the spam checker tool. The tool will provide a score and highlight any potential spam issues in your content.
Mobile Optimization
A significant portion of email is opened on mobile devices. Ensure that your emails are responsive and display correctly on all screen sizes. Use a mobile-friendly email template and optimize images for mobile viewing. Large images can slow down loading times and frustrate mobile users.
Example:
Use Sendinblue’s drag-and-drop email editor to create responsive email designs. Preview your emails on different mobile devices to ensure they look good on all screen sizes.
Practical Example:
In Sendinblue’s email editor, select a responsive template. When adding images, compress them to reduce their file size. Use Sendinblue’s preview feature to view your email on different devices, such as iPhone, Android phone, and tablets, to ensure proper rendering.
Quote: “Email is incredibly versatile. Combined with a great design, quality content, and effective list management, email marketing can transform any business.” – David Newman, Marketing Speaker and Author.
Monitoring and Reporting: Tracking Your Deliverability Performance
Monitoring your email deliverability performance is essential for identifying and addressing any issues that may be affecting your ability to reach your subscribers’ inboxes. Sendinblue provides comprehensive reporting tools that allow you to track key metrics such as open rates, click-through rates, bounce rates, and unsubscribe rates. By analyzing these metrics, you can gain insights into your email deliverability and make data-driven decisions to improve your results.
Analyzing Key Metrics
Pay close attention to the following metrics:
- Open Rate: The percentage of recipients who opened your email. A low open rate may indicate issues with your subject line or sender reputation.
- Click-Through Rate (CTR): The percentage of recipients who clicked on a link in your email. A low CTR may indicate that your content is not engaging or relevant to your audience.
- Bounce Rate: The percentage of emails that could not be delivered. High bounce rates can damage your sender reputation. Hard bounces indicate invalid email addresses, while soft bounces indicate temporary delivery issues.
- Unsubscribe Rate: The percentage of recipients who unsubscribed from your email list. A high unsubscribe rate may indicate that your content is not meeting your subscribers’ expectations or that you are sending emails too frequently.
Example:
If you notice a sudden drop in your open rates, investigate potential causes such as a change in your sending IP address, a spike in spam complaints, or a recent change to your email content.
Practical Example:
In Sendinblue, navigate to “Campaigns” and select a specific campaign. Review the “Report” section to see the open rate, CTR, bounce rate, and unsubscribe rate. Compare these metrics to your average performance to identify any significant deviations. For example, if your average open rate is 25% and a recent campaign has an open rate of only 10%, investigate potential issues with the subject line or content of that specific campaign.
Monitoring Bounce Rates and Spam Complaints
Pay close attention to your bounce rates and spam complaints. High bounce rates indicate that your email list may contain invalid or outdated email addresses. Spam complaints indicate that recipients are marking your emails as spam, which can severely damage your sender reputation. Sendinblue automatically handles bounced email addresses, but you should also monitor spam complaints and take steps to address any underlying issues.
Example:
If you notice a high bounce rate, use a list cleaning service to remove invalid email addresses from your list. If you receive spam complaints, review your email content and sending practices to identify potential issues that may be causing recipients to mark your emails as spam.
Practical Example:
In Sendinblue, review the bounce rate for each campaign in the “Report” section. If the bounce rate is consistently high (e.g., above 5%), consider using Sendinblue’s list cleaning feature or a third-party list cleaning service to remove invalid email addresses. Also, monitor the feedback loops (if you’ve set them up) for spam complaints. While Sendinblue handles unsubscribes from complaints, understanding *why* users marked your email as spam is crucial. Did the subject line mislead them? Was the content irrelevant?
Utilizing Feedback Loops
Feedback loops (FBLs) are mechanisms that allow email providers to notify senders when recipients mark their emails as spam. By setting up FBLs, you can receive valuable feedback about your sending practices and take steps to address any issues that may be causing recipients to mark your emails as spam. Sendinblue provides instructions on how to set up FBLs with major email providers.
Example:
Set up FBLs with Gmail, Yahoo, and Outlook to receive spam complaint notifications. Analyze these notifications to identify patterns and address any underlying issues that may be causing recipients to mark your emails as spam.
Practical Example:
Follow Sendinblue’s documentation to set up FBLs with major email providers. This typically involves verifying ownership of your sending IP address with each provider. Once configured, monitor the FBL reports you receive and investigate any spikes in spam complaints. Look for common themes in the complaints, such as misleading subject lines or irrelevant content. Use this information to refine your email marketing strategy and improve your deliverability.
Article Monster
Email marketing expert sharing insights about cold outreach, deliverability, and sales growth strategies.