How to Maximize Email Delivery with Zoho Forms: Tips and Tricks
Zoho Forms is a powerful tool for collecting data, but ensuring your email notifications reach the intended recipients’ inboxes can be a challenge. This article focuses on practical techniques to improve email delivery rates when using Zoho Forms, covering authentication, content optimization, and list management. By implementing these strategies, you can increase the reliability of your Zoho Forms email notifications and reduce the chances of them being marked as spam.
Understanding Email Delivery Challenges

- Emails going to spam: This is the most common issue, where your emails are flagged as spam by recipient mail servers.
- Blocked emails: In some cases, email servers might completely block emails from your domain.
- Bounces: Hard bounces (permanent delivery failures) and soft bounces (temporary delivery failures) both impact your sender reputation.
- Delayed delivery: Emails can be delayed due to server issues or aggressive spam filtering.
Understanding these challenges is the foundation for implementing effective strategies to improve email delivery and ensure your Zoho Forms notifications reach their intended recipients. The following sections will delve into specific techniques to address these issues.“Email deliverability is not a one-time fix but a continuous process of monitoring, optimization, and adaptation to evolving spam filtering techniques.” Email Marketing Expert
Setting Up SPF and DKIM for Your Domain

- Identify Zoho Forms’ Sending IP Addresses: Zoho Forms uses specific IP addresses for sending emails. Consult Zoho Forms documentation (or their support team if needed) for the current list. This is subject to change so always verify. For demonstration, let’s assume they tell you the IP is 192.168.1.1 and 192.168.1.2.
- Create an SPF Record: Access your domain’s DNS settings through your domain registrar or hosting provider. Create a TXT record with the following format:
v=spf1 ip4:192.168.1.1 ip4:192.168.1.2 a mx include:zoho.com ~allv=spf1: Specifies the SPF version.ip4:192.168.1.1andip4:192.168.1.2: Authorizes these IP addresses to send emails.a: Allows the IP addresses listed in the A record of your domain to send emails.mx: Allows the IP addresses listed in the MX record of your domain to send emails.include:zoho.com: This crucial part delegates SPF authentication to Zoho’s own SPF records, covering their infrastructure.~all: Specifies a soft fail, meaning emails from unauthorized sources will be marked as suspicious but not necessarily rejected. You could use-allfor a hard fail, but soft fail is generally recommended to avoid accidental blocking of legitimate emails.
- Publish the SPF Record: Save the TXT record in your DNS settings. It may take up to 48 hours for the changes to propagate across the internet.
- Generate a DKIM Key: Zoho Forms typically provides instructions and tools for generating a DKIM key pair (public and private key). You might need to contact their support or find it within your account settings under email authentication.
- Add the DKIM Record to DNS: Access your domain’s DNS settings. Zoho will provide you with a specific TXT record to add, which includes the public key. It will look something like:
yourdomainkey._domainkey IN TXT "v=DKIM1; k=rsa; p=MIGfMA0GCSqGSIb3DQEBAQUAA4GNADCBiQKBgQXXXXXXXXXXXXXXX..."(The “p=” value will be much longer). - Enable DKIM in Zoho Forms: Follow Zoho Forms’ instructions to enable DKIM signing for your outgoing emails. This usually involves linking your domain with the DKIM key you generated.
include: statements in your SPF record. Review your SPF record and consolidate or remove unnecessary includes. For DKIM, ensure that the public key in the DNS record matches the key configured in Zoho Forms. Double-check for typos!
Setting up SPF and DKIM correctly significantly enhances your email deliverability by authenticating your emails and preventing spoofing. Regularly verifying these records ensures that your email setup remains valid and effective.
Optimizing Email Content for Inbox Placement
The content of your email plays a significant role in determining whether it reaches the inbox or is flagged as spam. Optimizing your email content involves crafting compelling subject lines, writing clear and concise body text, and avoiding spam triggers that can negatively impact deliverability. By focusing on quality and relevance, you can increase the likelihood that your emails will be well-received and avoid spam filters. Subject lines are the first impression your email makes on recipients. A well-crafted subject line should be clear, concise, and relevant to the email’s content. Avoid using overly promotional or sensational language that can trigger spam filters. Instead, focus on providing a brief summary of the email’s purpose and creating a sense of urgency or curiosity. The body of your email should be well-structured and easy to read. Use short paragraphs, bullet points, and headings to break up the text and make it more scannable. Avoid using excessive formatting, such as large fonts or bright colors, which can make the email look unprofessional. Focus on providing valuable information and addressing the recipient’s needs. Also, make sure links are clearly defined and go to reputable sites. Avoid URL shorteners as they can be a red flag. Best Practices for Subject Lines- Keep it short: Aim for subject lines that are 50 characters or less to ensure they are fully visible on mobile devices.
- Be specific: Clearly state the purpose of the email. For example, instead of “Update,” use “Form Submission Received – [Form Name]”.
- Avoid spam words: Steer clear of words like “free,” “urgent,” “guaranteed,” and excessive use of exclamation marks.
- Personalize: If possible, include the recipient’s name or other relevant information to increase engagement. However, use personalization responsibly and avoid making it feel forced or unnatural.
- Use a clean and professional design: Avoid cluttered layouts and excessive use of images.
- Include a clear call to action: Tell recipients what you want them to do, whether it’s visiting a website or providing additional information.
- Provide an unsubscribe link: Make it easy for recipients to opt out of receiving future emails. This is legally required in many jurisdictions and helps maintain a clean email list.
- Test your emails: Before sending, test your emails on different devices and email clients to ensure they display correctly.
| Spam Trigger | Better Alternative |
|---|---|
| Excessive exclamation marks | Use concise and clear language |
| All caps subject lines | Use proper capitalization |
| “Free” or “Guaranteed” | Focus on value and benefits |
| Excessive images | Use a balanced mix of text and images |
| URL Shorteners | Use the complete URL if possible, or use a branded link shortener |
Managing Your Email List and Handling Bounces
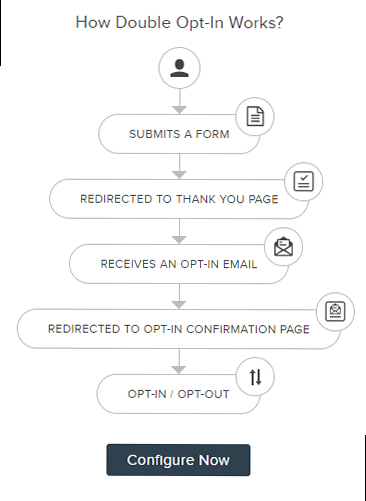
Maintaining a clean and up-to-date email list is crucial for improving email deliverability. Regularly removing invalid email addresses, handling bounces promptly, and providing clear opt-in and opt-out options are essential practices for managing your email list effectively. A well-managed email list reduces bounce rates, improves sender reputation, and ensures that your emails reach engaged recipients. Bounces occur when an email cannot be delivered to the intended recipient. Hard bounces indicate permanent delivery failures, such as invalid email addresses or non-existent domains. Soft bounces indicate temporary delivery failures, such as a full inbox or a temporary server issue. Handling bounces promptly is crucial because high bounce rates can negatively impact your sender reputation and lead to your emails being flagged as spam. Providing clear opt-in and opt-out options is also essential for maintaining a healthy email list. Opt-in options, such as requiring users to confirm their email address before being added to your list (double opt-in), ensure that only interested recipients are included. Opt-out options, such as an unsubscribe link in every email, make it easy for recipients to remove themselves from your list if they no longer wish to receive emails. Best Practices for Email List Management- Use Double Opt-In: Require users to confirm their email address before being added to your list. This ensures that you only include interested and valid email addresses.
- Regularly Clean Your List: Remove invalid email addresses and unsubscribe inactive subscribers. Use email validation tools to identify and remove invalid email addresses.
- Handle Bounces Promptly: Monitor bounce rates and remove hard bounces from your list immediately. Investigate and address the causes of soft bounces.
- Provide Clear Opt-Out Options: Include an unsubscribe link in every email and make it easy for recipients to opt out of receiving future emails.
Leveraging Zoho Campaigns Integration for Enhanced Deliverability
Integrating Zoho Forms with Zoho Campaigns provides a powerful combination for enhancing email deliverability. Zoho Campaigns offers advanced features for managing email campaigns, tracking engagement, and optimizing deliverability. By integrating these two tools, you can leverage Zoho Campaigns’ capabilities to improve the performance of your email notifications and ensure they reach the inbox. Zoho Campaigns provides features for segmenting your email list based on various criteria, such as demographics, interests, and behavior. This allows you to send more targeted and personalized emails, which can lead to higher open rates and lower bounce rates. Additionally, Zoho Campaigns offers A/B testing features that allow you to experiment with different subject lines, email content, and sending times to optimize your email campaigns. Furthermore, Zoho Campaigns provides detailed analytics and reporting features that allow you to track the performance of your email campaigns. You can monitor metrics such as open rates, click-through rates, bounce rates, and unsubscribe rates to identify areas for improvement. By leveraging these insights, you can continuously optimize your email campaigns and improve your overall email deliverability. Zoho Campaigns also handles unsubscribe requests automatically, preventing you from accidentally emailing someone who has opted out. Benefits of Integrating Zoho Forms with Zoho Campaigns- Centralized Email Management: Manage all your email campaigns in one place, streamlining your email marketing efforts.
- Advanced Segmentation: Segment your email list based on various criteria to send more targeted and personalized emails.
- A/B Testing: Experiment with different subject lines, email content, and sending times to optimize your email campaigns.
- Detailed Analytics and Reporting: Track the performance of your email campaigns and identify areas for improvement.
- Automated Bounce Handling: Automatically remove hard bounces from your email list to maintain a clean and up-to-date list.
- Connect Zoho Forms and Zoho Campaigns: In Zoho Forms, navigate to the “Integrations” section and select Zoho Campaigns. Follow the prompts to connect your Zoho Forms account with your Zoho Campaigns account. You will likely need to authorize the connection.
- Map Form Fields: Map the form fields in Zoho Forms to the corresponding fields in Zoho Campaigns. This ensures that data collected through your form is accurately transferred to Zoho Campaigns. For instance, map the “Email Address” field in your form to the “Email Address” field in Zoho Campaigns.
- Configure List Subscription: Configure the list subscription settings in Zoho Forms to automatically add new form submissions to your Zoho Campaigns mailing list. You can also choose to enable double opt-in to ensure that only interested recipients are added to your list.
sell Tags
Article Monster
Email marketing expert sharing insights about cold outreach, deliverability, and sales growth strategies.