How to Track Emails in HubSpot: A Comprehensive Guide
Effectively tracking your emails is crucial for understanding engagement, optimizing campaigns, and ultimately, driving better results with HubSpot. This article will provide a comprehensive guide on how to track emails in HubSpot, covering everything from connecting your inbox to analyzing email performance. We’ll explore different tracking methods, delve into advanced configurations, and offer practical examples to help you maximize your email marketing efforts.
Table of Contents:
- Connecting Your Inbox to HubSpot
- Tracking Emails with the HubSpot CRM Extension
- Analyzing Email Performance in HubSpot
- Troubleshooting Common Email Tracking Issues
Connecting Your Inbox to HubSpot

- Navigate to Conversations > Inbox in your HubSpot account.
- Click Connect a channel.
- Select Email, then Gmail.
- Click Connect to Gmail.
- Choose your Google account and grant HubSpot the necessary permissions.
- Configure your inbox settings, such as the team inbox to associate with.
- Navigate to Conversations > Inbox in your HubSpot account.
- Click Connect a channel.
- Select Email, then Office 365.
- Click Connect to Office 365.
- Select your Microsoft account and grant HubSpot the required permissions.
- Configure your inbox settings as needed.
- Navigate to Conversations > Inbox in your HubSpot account.
- Click Connect a channel.
- Select Email, then Other email account (IMAP).
- Enter your Email address, Password, Incoming server (IMAP), Port, and Security settings. These details are provided by your email provider. Common ports are 993 for IMAPS and 143 for IMAP. Security options are typically SSL or TLS.
- Enter your Outgoing server (SMTP), Port, and Security settings. Again, obtain these from your email provider. Common ports are 465 for SMTPS and 587 for STARTTLS.
- Click Connect inbox.
- Security: Ensure you are using secure SSL/TLS connections for both IMAP and SMTP to protect your email credentials.
- Email Provider Documentation: Always consult your email provider’s documentation for the correct IMAP and SMTP settings.
- Testing: After connecting, send a test email to confirm that it is being tracked correctly in HubSpot.
Tracking Emails with the HubSpot CRM Extension

- Navigate to the HubSpot CRM extension page in the Chrome Web Store or the Outlook AppSource. You can find these by searching “HubSpot CRM” in the respective stores.
- Click Add to Chrome or Get it now.
- Follow the on-screen instructions to complete the installation.
- Once installed, you’ll see the HubSpot icon in your browser toolbar or Outlook ribbon.
- Log in to your HubSpot account through the extension.
- Compose your email in Gmail.
- Before sending, look for the HubSpot tracking options at the bottom of the compose window. You should see checkboxes for “Track opens” and “Track clicks.”
- Enable the checkboxes to track email opens and clicks.
- If you want to log the email to HubSpot, ensure the “Log email in HubSpot” checkbox is also enabled. This will associate the email with the contact record in HubSpot.
- Click Send.
- Compose your email in Outlook.
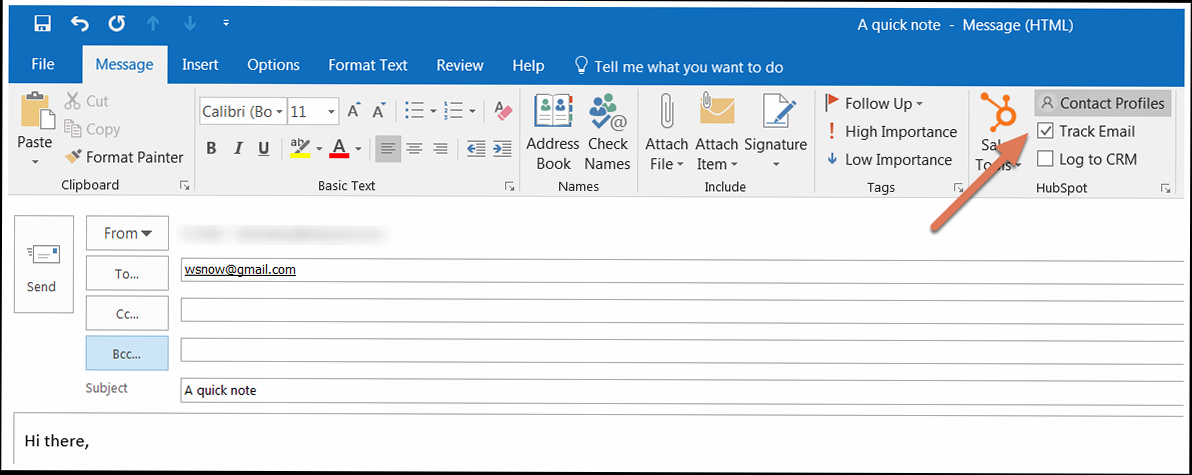
- Look for the HubSpot options in the Outlook ribbon. You should see options to “Track” and “Log.”
- Enable the “Track” option to track email opens and clicks.
- Enable the “Log” option to log the email to HubSpot.
- Click Send.
- When composing your email, simply uncheck the “Track opens” and “Track clicks” checkboxes (or the “Track” option in Outlook) before sending.
| Feature | Inbox Connection | CRM Extension |
|---|---|---|
| Automatic Logging | Yes | Yes (if enabled) |
| Open Tracking | Yes | Yes |
| Click Tracking | Yes | Yes |
| Send Later | No (requires Sequences or Sales Tools) | Yes (Schedule send feature) |
| Integration Level | Deeper integration with HubSpot features | Integration primarily for email tracking and logging |
| Setup | Requires connecting inbox through HubSpot settings | Requires installing browser extension |
| Best for | Users who want seamless, automated email tracking | Users who want more control over individual email tracking |
Analyzing Email Performance in HubSpot
Once you’ve connected your inbox and/or installed the HubSpot CRM extension, you can start analyzing the performance of your tracked emails within HubSpot. HubSpot provides detailed metrics on email opens, clicks, replies, bounces, and more, allowing you to understand how your emails are resonating with your audience and identify areas for improvement. Understanding these metrics is crucial for optimising your email marketing strategy and improving engagement. Example 1: Viewing Individual Email Activity To view the activity for a specific email, follow these steps:- Navigate to Contacts > Contacts in your HubSpot account.
- Select the contact who received the email.
- In the contact’s activity timeline, locate the email you want to analyze.
- Click on the email to expand the details.
- You’ll see information about when the email was opened, whether any links were clicked, and if the contact replied.
- Navigate to Automation > Sequences in your HubSpot account.
- Select the sequence you want to analyze.
- Click on the Analytics tab.
- Here you’ll see aggregate data for each email in the sequence, including open rates, click rates, and reply rates.
- You can also drill down into individual enrollment data to see how specific contacts interacted with the sequence.
- Navigate to Reports > Reports in your HubSpot account.
- Create a new report or select an existing email report.
- Customize the report to display the metrics you want to track, such as open rate, click-through rate, bounce rate, and emails sent.
- Filter the report by date range, email type, or other criteria to focus on specific segments of your email activity.
- Open Rate: The percentage of recipients who opened your email. This indicates how engaging your subject line was.
- Click-Through Rate (CTR): The percentage of recipients who clicked on a link in your email. This measures the relevance and effectiveness of your email content and calls-to-action.
- Bounce Rate: The percentage of emails that could not be delivered. High bounce rates can indicate outdated email lists or issues with your sending reputation. There are two types of bounces: hard bounces (permanent delivery failures) and soft bounces (temporary delivery failures).
- Reply Rate: The percentage of recipients who replied to your email. This indicates how engaging and thought-provoking your email was.
- Unsubscribe Rate: The percentage of recipients who unsubscribed from your email list. This suggests that your email content is not relevant or valuable to them.
- Spam Reports: The number of recipients who marked your email as spam. High spam report rates can damage your sending reputation and lead to your emails being blocked.
- When creating a marketing email, select the “A/B test” option.
- Create two different versions of your email, changing only one element at a time (e.g., subject line, call-to-action, image).
- Define the criteria for determining the winning version (e.g., open rate, click-through rate).
- Set the duration of the test and the percentage of recipients who will receive each version.
- HubSpot will automatically send the winning version to the remaining recipients.
Troubleshooting Common Email Tracking Issues
Even with proper setup, email tracking issues can sometimes arise. These issues can prevent you from accurately monitoring email engagement and can impact your overall marketing performance. This section outlines common troubleshooting steps to address these issues and ensure accurate email tracking in HubSpot. Example 1: Emails Not Logging to HubSpot Problem: Emails are not being logged to contact records in HubSpot, even though you have a connected inbox or are using the HubSpot CRM extension. Troubleshooting Steps:- Verify Inbox Connection: Ensure your inbox is properly connected to HubSpot and that the connection is active. Navigate to Conversations > Inbox and check the connection status. If the connection is broken, reconnect your inbox.
- Check CRM Extension Settings: If using the HubSpot CRM extension, verify that the “Log email in HubSpot” option is enabled by default in the extension settings. Also, confirm that you’re logged into the extension with the correct HubSpot account.
- Email Address Association: Make sure the email address you’re sending from is associated with a user in your HubSpot account. Go to Settings > Users & Teams and verify that your email address is listed.
- Check Contact Email Address: Ensure the recipient’s email address in your email client matches the email address associated with the contact record in HubSpot. Small discrepancies can prevent emails from being logged correctly.
- Firewall/Antivirus Interference: Sometimes, firewall or antivirus software can interfere with the HubSpot CRM extension’s ability to log emails. Temporarily disable these programs to see if the issue resolves. If it does, configure exceptions for the HubSpot CRM extension.
- Verify Tracking is Enabled: Ensure that email tracking is enabled in your HubSpot account settings (Settings > Tracking & Analytics > Email Tracking) and in the HubSpot CRM extension settings (if applicable).
- Check HTML Formatting: Ensure that your emails are being sent in HTML format. Plain text emails cannot be tracked. HubSpot automatically tracks HTML emails.
- Image Blocking: Recipients may have image blocking enabled in their email client. Email open tracking relies on a small, invisible tracking pixel embedded in the email. If images are blocked, the pixel won’t load, and the open will not be tracked. Encourage recipients to enable images in their email client or add your sending address to their safe sender list.
- Email Client Compatibility: Some older email clients may not fully support HTML email or may strip out tracking pixels. Test your emails with different email clients to ensure they are being tracked correctly.
- Privacy Settings: Recipients may have privacy settings enabled that prevent tracking pixels from loading.
- Verify Tracking is Enabled: Similar to email opens, ensure that click tracking is enabled in your HubSpot account and CRM extension settings.
- Link Formatting: Ensure that all links in your email are properly formatted as HTML links (e.g., Example Link). Plain text links will not be tracked.
- Link Redirection Issues: HubSpot uses link redirection to track clicks. Ensure that your links are not being blocked or modified by any security software or URL shorteners.
- Broken Links: Double-check that all links in your email are working correctly and point to the intended destination. Broken links will obviously not register any clicks.
- Clean Your Email List: Regularly clean your email list to remove invalid, inactive, or duplicate email addresses. Use a reputable email verification service to identify and remove bad addresses.
- Implement Double Opt-In: Use a double opt-in process for new subscribers to ensure that they have confirmed their email address and are genuinely interested in receiving your emails.
- Authenticate Your Email: Set up SPF, DKIM, and DMARC records for your sending domain to authenticate your emails and improve deliverability. This helps email providers verify that your emails are legitimate and not spam. You’ll need access to your domain’s DNS settings to configure these records.
- Monitor Your Sending Reputation: Monitor your sending reputation using tools like Google Postmaster Tools or Sender Score. Low sender reputation can lead to your emails being flagged as spam.
- Review Email Content: Avoid using spam trigger words or phrases in your email subject lines and content. Also, avoid using excessive capitalization or exclamation points.
person
Article Monster
Email marketing expert sharing insights about cold outreach, deliverability, and sales growth strategies.