How to Stop Spam Emails on Outlook
Spam emails are a constant nuisance, clogging our inboxes and potentially exposing us to phishing scams and malware. If you’re an Outlook user, you’re likely familiar with this struggle. This article provides a comprehensive guide to effectively combat spam in Outlook, focusing on advanced techniques to drastically reduce unwanted emails and improve your overall email experience. We will explore utilizing Outlook’s built-in features, creating advanced rules, and leveraging third-party tools to achieve a cleaner, safer inbox.
Table of Contents
- Leveraging Outlook’s Built-in Spam Filters
- Creating Advanced Outlook Rules for Spam Management
- Utilizing the Safe and Blocked Senders Lists Effectively
- Implementing Third-Party Spam Filtering Solutions
- Analyzing Email Headers to Identify Spam Patterns
Leveraging Outlook’s Built-in Spam Filters

- Open Outlook.
- Click on the Home tab.
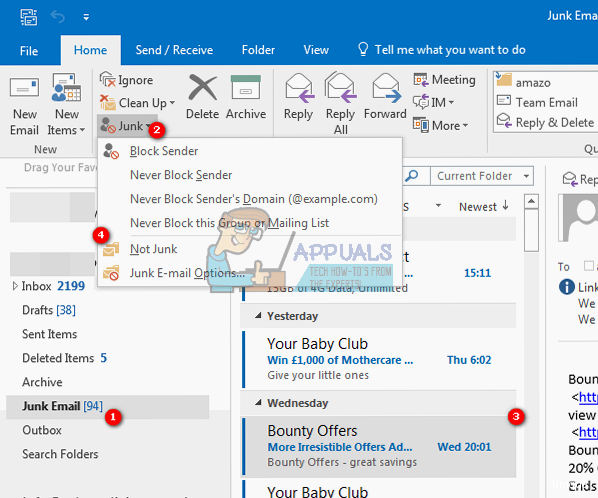
- In the Delete group, click the arrow next to Junk and select Junk E-mail Options…
- In the Options tab, choose the desired protection level: No Automatic Filtering, Low, High, or Safe Lists Only.
- Click Apply and then OK.
- Content analysis: Examining the email’s body, subject line, and attachments for spam-related keywords and phrases.
- Sender reputation: Checking the sender’s IP address and domain against blacklists and whitelists.
- Heuristic analysis: Identifying suspicious patterns in the email’s structure and code.
- Phishing detection: Detecting emails that attempt to steal personal information or credentials.
Expert Tip: Regularly review your Junk Email folder and mark any legitimate emails as “Not Junk.” This helps train Outlook’s filter and improve its accuracy over time.
Email Security Expert
Creating Advanced Outlook Rules for Spam Management

- Open Outlook.
- Click on the File tab.
- Click Manage Rules & Alerts.
- In the Rules and Alerts dialog box, click New Rule…
- Select a template or start from a blank rule.
- Specify the conditions for the rule.
- Specify the actions for the rule.
- Name the rule and click Finish.
# Rule Description: Delete emails with spam keywords in the subject
# Condition: Subject contains "Limited Time Offer" OR "Free Gift" OR "Urgent Action Required"
# Action: Delete the message# Rule Description: Delete emails from a specific domain
# Condition: From contains "@spamdomain.com"
# Action: Delete the messageUtilizing the Safe and Blocked Senders Lists Effectively
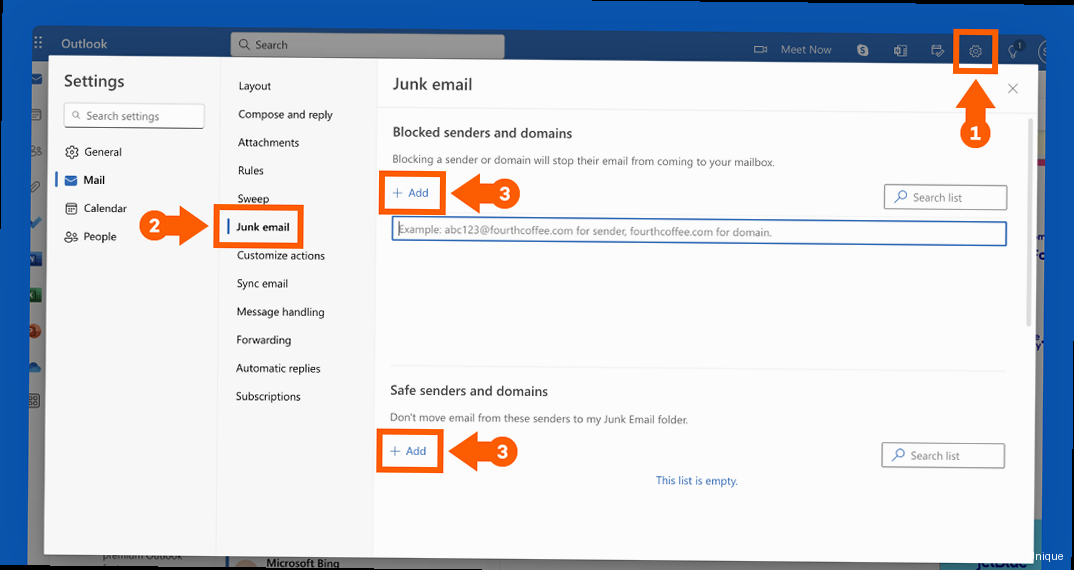
Outlook’s Safe Senders and Blocked Senders lists are essential tools for controlling which emails are delivered to your inbox and which are treated as spam. By carefully managing these lists, you can fine-tune Outlook’s spam filter and ensure that important emails are not mistakenly flagged as junk while effectively blocking unwanted messages. These lists override the general spam filter settings, providing more granular control over your email flow. Understanding Safe Senders List The Safe Senders list contains email addresses and domains that you trust. Emails from senders on this list are always delivered to your inbox, regardless of the content or other filter settings. Adding frequently contacted individuals, important business contacts, and newsletters you subscribe to the Safe Senders list ensures that you never miss their emails. Regularly review your Safe Senders list to ensure it is up-to-date and only contains legitimate senders. To manage the Safe Senders list in Outlook, follow these steps:- Open Outlook.
- Click on the Home tab.
- In the Delete group, click the arrow next to Junk and select Junk E-mail Options…
- In the Safe Senders tab, click Add…
- Enter the email address or domain you want to add.
- Click OK and then Apply and OK in the Junk E-mail Options dialog box.
- Open Outlook.
- Click on the Home tab.
- In the Delete group, click the arrow next to Junk and select Junk E-mail Options…
- In the Blocked Senders tab, click Add…
- Enter the email address or domain you want to add.
- Click OK and then Apply and OK in the Junk E-mail Options dialog box.
Implementing Third-Party Spam Filtering Solutions
While Outlook’s built-in spam filter and rules engine are useful, they may not be sufficient for users who receive a high volume of spam or require more advanced filtering capabilities. Third-party spam filtering solutions offer a range of features and benefits that can significantly enhance spam protection. These solutions often employ more sophisticated algorithms, real-time blacklists, and cloud-based analysis to identify and block spam before it even reaches your inbox. Types of Third-Party Spam Filtering Solutions Third-party spam filtering solutions come in various forms, including:- Desktop software: Programs installed on your computer that filter emails before they are downloaded to Outlook.
- Server-side filters: Filters installed on your email server that block spam before it reaches individual mailboxes.
- Cloud-based services: Services that filter emails in the cloud before delivering them to your inbox.
# Example SpamAssassin configuration
required_score 5.0
rewrite_header Subject *SPAM*
report_safe 0
use_bayes 1
bayes_auto_learn 1| Solution Type | Advantages | Disadvantages |
|---|---|---|
| Desktop Software | More control, customizable. | Requires more maintenance, resource intensive. |
| Server-Side Filters | Efficient, centrally managed. | Requires server access, technical expertise. |
| Cloud-Based Services | Convenient, scalable, up-to-date. | Relies on a third-party provider. |
Analyzing Email Headers to Identify Spam Patterns
Email headers contain valuable information about the origin and path of an email. While often overlooked, analyzing email headers can reveal crucial details about spam patterns and help you identify the source of unwanted messages. By understanding how to interpret email headers, you can create more effective filtering rules and report spam to the appropriate authorities. This is a more advanced technique, but it can be incredibly helpful in targeting persistent spam campaigns. Understanding Key Email Header Fields Several key fields in the email header provide important clues about the email’s origin and authenticity:- Received: This field shows the path the email took from the sender to your inbox, including the IP addresses of the mail servers it passed through.
- Return-Path: This field indicates the address where bounce messages are sent. It can be different from the From address and may reveal the true sender of the email.
- From: This field shows the sender’s email address as it appears in your inbox. However, this address can be easily forged.
- Reply-To: This field specifies the address where replies should be sent. It may be different from the From address.
- Message-ID: This field is a unique identifier for the email. It can be used to track the email across different systems.
- Authentication-Results: This field shows the results of authentication checks, such as SPF, DKIM, and DMARC, which are used to verify the sender’s identity.
Received: from mail.example.com (unknown [203.0.113.45]) by mail.yourdomain.com with ESMTPSA...whois 203.0.113.45Authentication-Results: mx.google.com;
spf=pass (google.com: domain of spammer@example.com designates 203.0.113.45 as permitted sender) smtp.mailfrom=spammer@example.com;
dkim=neutral (message not signed) header.i=none;
dmarc=fail (p=NONE sp=NONE dis=NONE) d=example.comMessage-ID: <randomstring@spamdomain.com>Article Monster
Email marketing expert sharing insights about cold outreach, deliverability, and sales growth strategies.