How to Create Segments in Mailchimp: A Comprehensive Guide
Mailchimp segments allow you to target specific groups of your audience with tailored email campaigns, boosting engagement and conversions. This article provides a detailed, step-by-step guide on creating effective segments within Mailchimp. We’ll cover various segmentation criteria, from basic demographic data to advanced behavioral targeting, ensuring you get the most out of your email marketing efforts. Learn how to refine your messaging and improve your campaign performance by reaching the right people with the right content at the right time.
Table of Contents
- Understanding Segmentation in Mailchimp
- Creating Static Segments Based on Subscriber Data
- Creating Dynamic Segments Based on Engagement
- Advanced Segmentation Techniques and Integrations
- Segmentation Best Practices for Optimal Delivery
Understanding Segmentation in Mailchimp

- Increased Engagement: Sending relevant content increases the likelihood that subscribers will open, read, and click on your emails.
- Improved Deliverability: Engaged subscribers are less likely to mark your emails as spam, improving your sender reputation and deliverability.
- Higher Conversion Rates: Tailored messaging can significantly boost conversion rates by addressing specific needs and interests.
- Reduced Unsubscribes: Subscribers are less likely to unsubscribe from emails that are relevant and valuable to them.
- Personalized Customer Experience: Segmentation enables you to create a more personalized customer experience, fostering stronger relationships and loyalty.
- Demographic Data: Age, gender, location, language, etc.
- Purchase History: Products purchased, order frequency, average order value, etc.
- Website Activity: Pages visited, products viewed, time spent on site, etc.
- Email Engagement: Open rates, click-through rates, previous campaign interactions, etc.
- Signup Source: How subscribers joined your list (e.g., website form, landing page, event).
- Tags: Custom labels you assign to subscribers based on specific characteristics or behaviors.
- Predictive Data: Mailchimp uses data to create segments with people that are more or less likely to open your emails.
Creating Static Segments Based on Subscriber Data

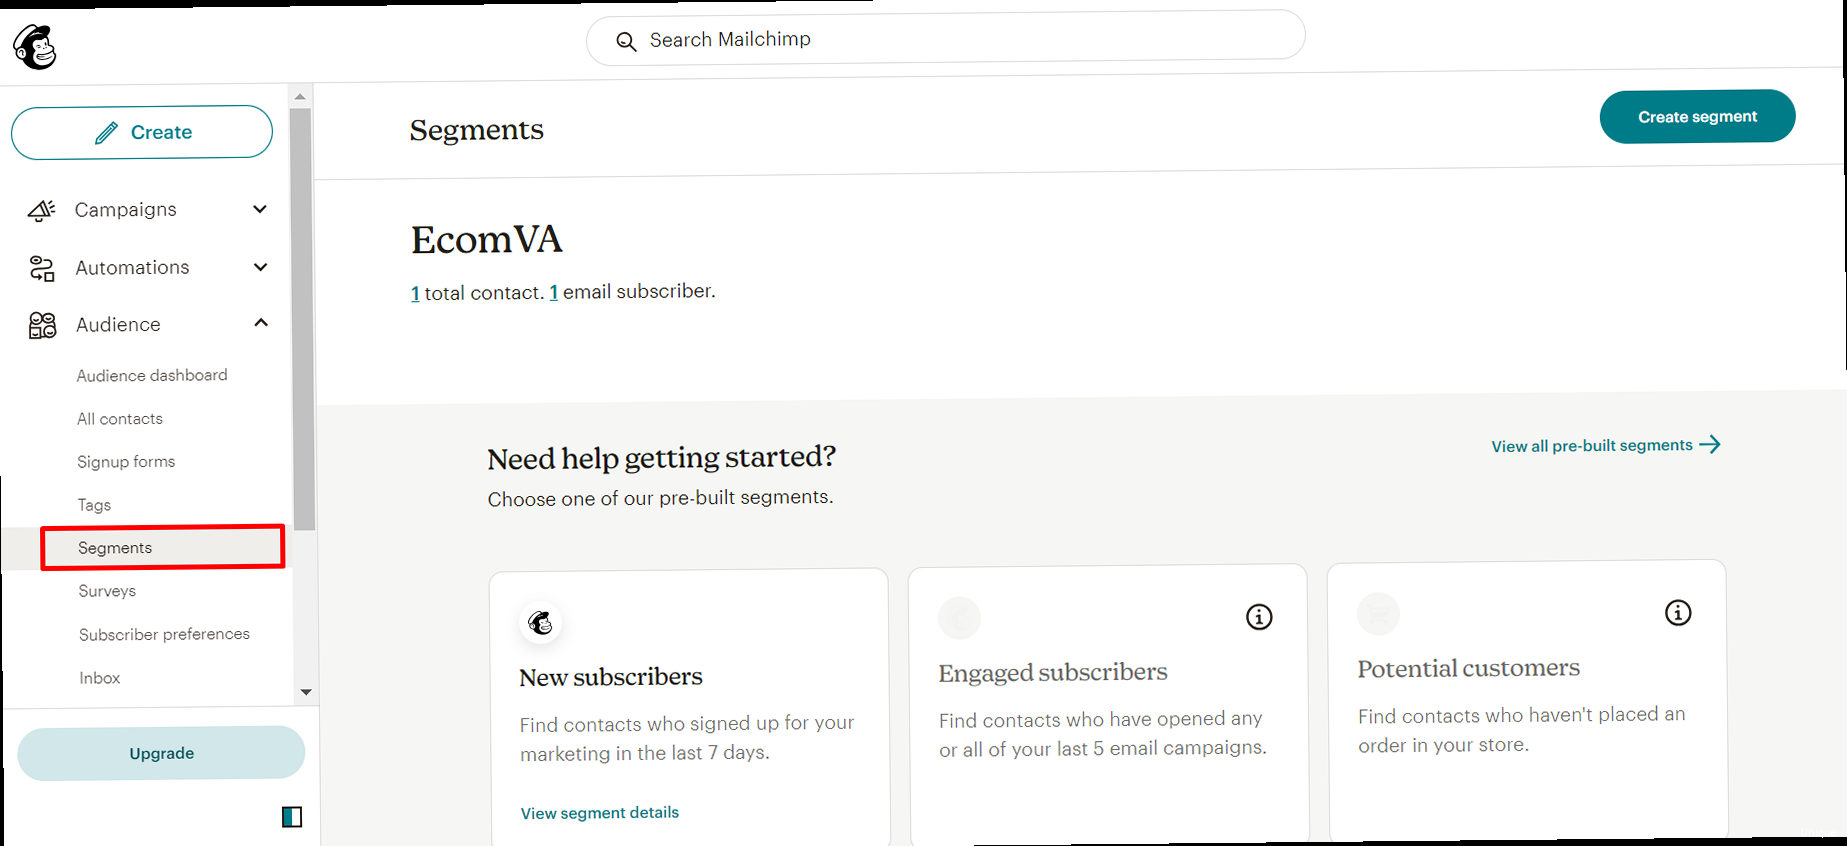
- Navigate to Audience: In your Mailchimp dashboard, click on “Audience” in the left-hand navigation menu.
- Select Segments: Click on “Segments” from the dropdown menu.
- Create Segment: Click the “Create Segment” button.
- Segment Type: Click on “Static segment”.
- Add Subscribers: There are several options available:
- Add Subscribers: If you have only a few people to add, you can add them one at a time here.
- Import Subscribers: If you have a list of people to import, you can import them directly.
- Copy and Paste Subscribers: Copy subscribers from a file and paste them here.
- Name Your Segment: Give your segment a descriptive name (e.g., “VIP Customers – 2023”). This will help you easily identify it later.
- Save Your Segment: Click the “Save Segment” button.
- One-Time Campaigns: For sending emails related to a specific event or promotion that won’t be repeated.
- Manual Curation: When you need to manually control which subscribers are included in a segment.
- Small, Stable Groups: When the criteria for the segment are unlikely to change frequently.
Creating Dynamic Segments Based on Engagement
Dynamic segments are powerful tools that automatically update your audience based on predefined criteria. These segments are ideal for targeting subscribers based on their behavior, engagement level, purchase history, and other dynamic attributes. As subscribers’ data changes, Mailchimp automatically adds them to or removes them from the segment, ensuring your targeting remains accurate and up-to-date. Step-by-Step Guide to Creating a Dynamic Segment- Navigate to Audience: In your Mailchimp dashboard, click on “Audience” in the left-hand navigation menu.
- Select Segments: Click on “Segments” from the dropdown menu.
- Create Segment: Click the “Create Segment” button.
- Segment Type: Click on “All contacts” or “Contacts who are subscribed”.
- Set Conditions: Use the dropdown menus to define your segmentation criteria. You can combine multiple conditions using “AND” or “OR” logic.
- Preview Segment: Click the “Preview Segment” button to see which subscribers meet your criteria.
- Name Your Segment: Give your segment a descriptive name (e.g., “Engaged Subscribers – Last 30 Days”).
- Save Your Segment: Click the “Save Segment” button.
- Email Activity: Opened, not opened, clicked, not clicked, specific link clicked, subscribed, unsubscribed.
- E-commerce Data: Purchased any product, purchased specific product, order total, order count.
- Contact Details: Age, gender, location, language, signup date, tags.
- Campaign Activity: Sent specific campaign, opened specific campaign, clicked specific campaign.
- List details: Opt-in time, member rating, is a VIP
Advanced Segmentation Techniques and Integrations
Beyond basic demographic and engagement data, Mailchimp offers advanced segmentation techniques that leverage integrations with other platforms and custom data to create highly targeted segments. These techniques can significantly improve the effectiveness of your email marketing efforts. Integration with E-commerce Platforms Integrating Mailchimp with your e-commerce platform (e.g., Shopify, WooCommerce, Magento) unlocks a wealth of customer data that can be used for advanced segmentation. This data includes:- Purchase History: Products purchased, order value, order frequency.
- Customer Lifetime Value (CLTV): Predicted revenue a customer will generate.
- Product Categories: Categories of products a customer has purchased.
- Abandoned Cart Data: Items left in a customer’s shopping cart.
- High-Value Customers: Customers with a CLTV above a certain threshold.
- Customers Who Purchased a Specific Product Category: Send targeted promotions for related products.
- Abandoned Cart Recovery: Send emails to customers who left items in their cart to encourage them to complete their purchase.
- Likely to Open: Subscribers who are most likely to open your emails based on their past behavior.
- Likely to Unsubscribe: Subscribers who are at risk of unsubscribing from your list.
Segmentation Best Practices for Optimal Delivery
Creating effective segments is only half the battle. To maximize the impact of your segmentation efforts, it’s crucial to follow best practices that ensure optimal deliverability and engagement. Here are some key considerations: Maintain List Hygiene Regularly clean your email list to remove inactive subscribers, bounced email addresses, and spam traps. This will improve your sender reputation and deliverability. Mailchimp offers tools to automatically identify and remove these types of subscribers. Specifically, consider automatically removing subscribers who haven’t opened an email in a certain timeframe (e.g., 6 months, 1 year). You can create a dynamic segment of these inactive subscribers and then either try to re-engage them with a special offer or remove them from your list. Use Double Opt-In Double opt-in requires subscribers to confirm their email address before being added to your list. This helps to prevent spam signups and ensures that you only have engaged subscribers. Although it can reduce the initial list growth, the people on your list will be much more engaged with your company. Personalize Your Messaging Segmentation allows you to personalize your email content to resonate with each segment. Use merge tags to address subscribers by name, reference their purchase history, or tailor your messaging to their specific interests. Don’t simply include their name, though, that is easily done. Make sure the *content* of the email speaks to the individual subscriber. For instance, if you’re sending an email to customers who purchased a specific product, you can mention that product by name and offer related products or accessories. If you’re targeting subscribers in a particular location, you can reference local events or landmarks. Test Your Segments and Campaigns Before sending a campaign to a large segment, always test it with a smaller subset to ensure that your segmentation criteria are accurate and your messaging is effective. Use A/B testing to experiment with different subject lines, content, and calls to action to optimize your results. For example, you could create two versions of an email with different subject lines and send them to a small portion of your “Engaged Subscribers” segment. Track the open rates for each version and then send the winning version to the rest of the segment. Monitor Your Results and Iterate Continuously monitor the performance of your segmented campaigns and adjust your segmentation strategies based on the results. Track key metrics such as open rates, click-through rates, conversion rates, and unsubscribe rates to identify areas for improvement. For instance, if you notice that a particular segment has a low open rate, you might need to refine your segmentation criteria or improve your subject lines. If a segment has a high unsubscribe rate, you might need to re-evaluate the relevance of your content to that group. By consistently applying these best practices, you can leverage segmentation to create more effective email campaigns, improve your sender reputation, and build stronger relationships with your subscribers.“The key to successful email marketing is to treat your subscribers like individuals, not just numbers on a list. Segmentation allows you to do just that.” – Email Marketing Proverb
