How to Stop Spam on Outlook: A Comprehensive Guide
Tired of endless spam filling your Outlook inbox? You’re not alone. This guide provides a comprehensive and practical approach to drastically reduce spam and improve your email experience. We’ll delve into advanced filtering techniques, sender authentication protocols, and best practices to keep your inbox clean and focused on what matters.
In this article, you’ll learn how to leverage Outlook’s built-in features, configure advanced spam filtering options, and implement techniques like SPF, DKIM, and DMARC to enhance email security and deliverability. Let’s get started on reclaiming your inbox!
Table of Contents
- Leveraging Outlook’s Built-in Spam Filters
- Creating Advanced Filtering Rules in Outlook
- Implementing SPF, DKIM, and DMARC for Your Domain
- Effectively Reporting and Blocking Spam Senders
- Best Practices for Maintaining Email Security and Privacy
Leveraging Outlook’s Built-in Spam Filters

- Access Junk Email Options: In Outlook, go to Home > Junk > Junk E-mail Options…
- Choose a Protection Level: You can select from several levels of protection:
- No Automatic Filtering: This disables the Junk Email Filter completely. Not recommended.
- Low: Moves only the most obvious junk email to the Junk Email folder. This is a good starting point if you’re concerned about false positives.
- High: Catches more junk email but also has a higher risk of incorrectly flagging legitimate messages as spam (false positives).
- Safe Lists Only: Only emails from senders or domains on your Safe Senders List will be delivered to your inbox. All other emails are treated as junk.
- Safe Senders List: Add email addresses and domains to your Safe Senders List to ensure that messages from these sources are always delivered to your inbox. Click “Safe Senders” tab and add emails/domains.
- Safe Recipients List: If you send emails to a distribution list, you can add that list to the Safe Recipients List to ensure that replies from list members are not marked as junk.
- Blocked Senders List: Add email addresses and domains to your Blocked Senders List to automatically move messages from these sources to the Junk Email folder. Click “Blocked Senders” and add emails/domains.
- International: You can block emails from specific countries or regions by going to the “International” tab.
- Go to Home > Junk > Junk E-mail Options…
- Click the Safe Senders tab.
- Click Add…
- Enter “invoices@examplecompany.com” and click OK.
- Click Apply and then OK to save your changes.
- Go to Home > Junk > Junk E-mail Options…
- Click the Blocked Senders tab.
- Click Add…
- Enter “@spammydomain.com” and click OK.
- Click Apply and then OK to save your changes.
Creating Advanced Filtering Rules in Outlook

- Access Rules and Alerts: In Outlook, go to File > Info > Manage Rules & Alerts.
- Create a New Rule: Click New Rule…
- Start from a Template or Create a Blank Rule: You can choose from a variety of templates or start with a blank rule. For spam filtering, “Apply rules on messages I receive” is often the best option. Click Next.
- Specify Conditions: Select the conditions that you want to use to identify spam. Common conditions include:
- from people or distribution list: Specify the sender’s email address.
- with specific words in the subject: Specify keywords that are common in spam emails.
- with specific words in the message body: Specify keywords that are common in spam emails.
- with specific words in the sender’s address: This can be useful for blocking domains.
- Specify Actions: Select the actions that you want to perform on messages that match the specified conditions. Common actions include:
- move it to the specified folder: Move the message to the Junk Email folder or a custom “Suspected Spam” folder.
- delete it: Delete the message permanently. Use this option with caution.
- permanently delete it: Bypasses the Deleted Items folder and immediately deletes the message. Use with extreme caution.
- mark it as junk: Marks the message as junk, allowing Outlook’s learning filter to improve over time.
- Specify Exceptions (Optional): Add exceptions to the rule to prevent it from being applied to legitimate messages. For example, you could add an exception that prevents the rule from being applied to messages from senders on your Safe Senders List.
- Name the Rule: Give the rule a descriptive name so you can easily identify it later.
- Turn on the Rule: Make sure the “Turn on this rule” checkbox is selected.
- Click Finish.
- Go to File > Info > Manage Rules & Alerts > New Rule…
- Select “Apply rules on messages I receive” and click Next.
- Select “with specific words in the subject” and click the “specific words” link in the bottom pane.
- Enter keywords like “Viagra,” “Loan,” “Discount,” and “Free” (separate each keyword by pressing Enter). Click OK.
- Click Next.
- Select “move it to the specified folder” and click the “specified” link in the bottom pane.
- Select the Junk Email folder and click OK.
- Click Next.
- (Optional) Add exceptions if needed. Click Next.
- Name the rule “Spam Keywords in Subject” and click Finish.
- Go to File > Info > Manage Rules & Alerts > New Rule…
- Select “Apply rules on messages I receive” and click Next.
- Select “from people or distribution list” and click the “people or distribution list” link in the bottom pane.
- Enter “@spammydomain.com” (or the specific email address). Click OK.
- Click Next.
- Select “permanently delete it”.
- Click Next.
- (Optional) Add exceptions if needed. Click Next.
- Name the rule “Delete Spammydomain.com” and click Finish.
- Go to File > Info > Manage Rules & Alerts > New Rule…
- Select “Apply rules on messages I receive” and click Next.
- Select “is in [specific language]” and click the “[specific language]” link.
- Choose the languages you DO NOT typically receive emails in (e.g., Chinese, Russian, etc.). Click OK.
- Click Next.
- Select “mark it as junk”.
- Click Next.
- (Optional) Add exceptions if needed. Click Next.
- Name the rule “Mark Foreign Language Emails as Junk” and click Finish.
Implementing SPF, DKIM, and DMARC for Your Domain
Sender authentication is a crucial step in preventing email spoofing and improving email deliverability. SPF (Sender Policy Framework), DKIM (DomainKeys Identified Mail), and DMARC (Domain-based Message Authentication, Reporting & Conformance) are three key technologies that work together to verify the authenticity of email senders. While configuring these records requires access to your domain’s DNS settings, they significantly reduce the chances of spammers impersonating your domain and improve your email’s chances of reaching recipients’ inboxes. This section explains how to implement these technologies. Here’s a breakdown of each technology and how to implement them:- SPF (Sender Policy Framework):
- Purpose: Specifies which mail servers are authorized to send emails on behalf of your domain. This prevents spammers from using your domain in the “From” address.
- Implementation: Create a TXT record in your domain’s DNS settings. The record should list the IP addresses of your authorized mail servers.
- Example:
v=spf1 ip4:192.0.2.0/24 ip4:198.51.100.0/24 include:spf.protection.outlook.com -allv=spf1: Specifies the SPF version.ip4:192.0.2.0/24andip4:198.51.100.0/24: Allow emails from these IP address ranges. Replace these with your actual mail server IP addresses.include:spf.protection.outlook.com: Includes Microsoft’s SPF records, which is important if you’re using Outlook 365.-all: Specifies that any email not originating from the listed IP addresses should be rejected. Using~allis a “soft fail” indicating the email *might* be spoofed.-allis more strict.
- DKIM (DomainKeys Identified Mail):
- Purpose: Adds a digital signature to your outgoing emails, allowing recipient mail servers to verify that the message hasn’t been tampered with during transit and that it was indeed sent by an authorized server.
- Implementation: Generate a DKIM key pair (public and private). Add the public key as a TXT record in your domain’s DNS settings and configure your mail server to sign outgoing emails with the private key.
- Example: You’ll need to generate a DKIM key through your email provider or a third-party service. The TXT record will look something like this:
default._domainkey.example.com IN TXT "v=DKIM1; k=rsa; p=MIIBIjANBgkqhkiG9w0BAQEFAAOCAQ8AMIIBCgKCAQEAwKsWyE19n7E7i0ewPNwFwYgL8lYj...";default._domainkey.example.com: This is the selector and domain. Replace “default” with your selector if your provider uses something else.v=DKIM1: Specifies the DKIM version.k=rsa: Specifies the key type.p=MIIBIjANBgkqhkiG9w0BAQEFAAOCAQ8AMIIBCgKCAQEAwKsWyE19n7E7i0ewPNwFwYgL8lYj...: This is the public key. A *very* long string of characters.
- DMARC (Domain-based Message Authentication, Reporting & Conformance):
- Purpose: Tells recipient mail servers what to do with emails that fail SPF and DKIM checks. It also provides reporting mechanisms to help you monitor your email authentication status.
- Implementation: Create a TXT record in your domain’s DNS settings. The record specifies the policy that recipient mail servers should apply to emails that fail authentication.
- Example:
_dmarc.example.com IN TXT "v=DMARC1; p=reject; rua=mailto:dmarc-reports@example.com; ruf=mailto:dmarc-forensic@example.com; adkim=r; aspf=r; pct=100; rf=afrf; sp=reject"_dmarc.example.com: Standard DMARC record name.v=DMARC1: Specifies the DMARC version.p=reject: Tells recipient mail servers to reject emails that fail SPF and DKIM checks. Other options arequarantine(move to spam) andnone(take no action – good for initial monitoring).rua=mailto:dmarc-reports@example.com: Specifies the email address to which aggregate reports should be sent.ruf=mailto:dmarc-forensic@example.com: Specifies the email address to which forensic reports (failure samples) should be sent.adkim=randaspf=r: Set DKIM and SPF alignment to “relaxed” – less strict alignment. “s” is strict alignment.pct=100: Applies the policy to 100% of failing messages.rf=afrf: Report format.sp=reject: Policy for subdomains (set to reject in this example).
v=spf1 ip4:203.0.113.45 include:spf.protection.outlook.com -all- Log in to the Microsoft 365 admin center.
- Go to Settings > Domains.
- Select your domain.
- Click on “DKIM”.
- Follow the instructions to create the necessary CNAME records. The records will look something like:
- Record Name:
selector1._domainkey.yourdomain.comValue:selector1-yourdomain-com.mail.protection.outlook.com - Record Name:
selector2._domainkey.yourdomain.comValue:selector2-yourdomain-com.mail.protection.outlook.com
- Record Name:
- After adding the records, enable DKIM for your domain in the Microsoft 365 admin center. It can take up to 48 hours for the changes to propagate.
_dmarc.example.com IN TXT "v=DMARC1; p=none; rua=mailto:dmarc-reports@example.com"Effectively Reporting and Blocking Spam Senders
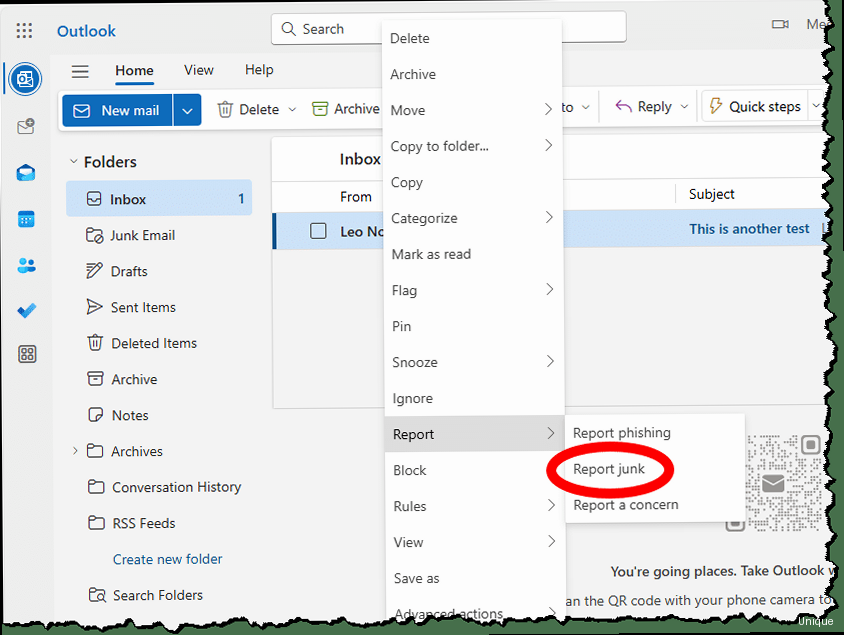
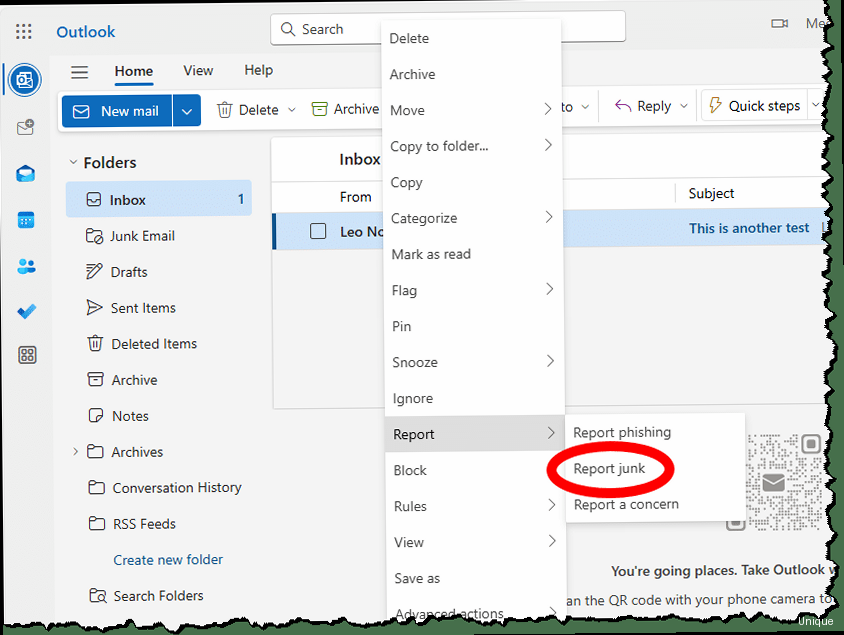
While automated filtering and sender authentication are crucial, manual reporting and blocking play an important role in maintaining a clean inbox. By actively reporting spam and blocking persistent senders, you contribute to improving the overall spam detection accuracy and prevent unwanted messages from reaching your inbox. This section details how to effectively use Outlook’s reporting and blocking features, and best practices. Here’s how to report and block spam in Outlook:- Reporting Spam:
- Select the spam email in your inbox.
- Click the Junk button on the Home tab.
- Choose Report as Junk. This will move the email to the Junk Email folder and report it to Microsoft to help improve their spam filters. In some cases, depending on configuration, your IT department may also receive a copy of the report.
- If you accidentally marked a legitimate email as junk, select it in the Junk Email folder and click Not Junk. This will move the email back to your inbox and inform Microsoft that the email is not spam.
- Blocking Senders:
- Select the spam email in your inbox.
- Click the Junk button on the Home tab.
- Choose Block Sender. This will move the email to the Junk Email folder and add the sender’s email address to your Blocked Senders List. All future emails from that sender will automatically be moved to the Junk Email folder.
- To manage your Blocked Senders List, go to Home > Junk > Junk E-mail Options… and click the Blocked Senders tab. You can add or remove senders from the list.
- Select the email.
- Click the Junk button.
- Choose Report as Phishing (if available). This will report the email to Microsoft and your IT department (if configured) and help prevent others from falling victim to the scam.
- Select one of the spam emails.
- Click the Junk button.
- Choose Block Sender.
- Go to Home > Junk > Junk E-mail Options…
- Click the Blocked Senders tab.
- Edit the blocked sender to “@spammydomain.com”. This will block all emails from that domain. Be *very* careful blocking domains – ensure you’re not blocking important emails.
- Go to File > Info > Manage Rules & Alerts > New Rule…
- Select “Apply rules on messages I receive” and click Next.
- Select “from people or distribution list” and click the “people or distribution list” link in the bottom pane.
- Add all the email addresses currently in your Blocked Senders List (or just enter @domain.com to block the entire domain). Click OK.
- Click Next.
- Select “permanently delete it”.
- Click Next.
- (Optional) Add exceptions if needed. Click Next.
- Name the rule “Permanently Delete Blocked Senders” and click Finish.
Best Practices for Maintaining Email Security and Privacy
Beyond the specific steps outlined above, adopting broader email security best practices is essential for preventing spam and protecting your personal information. These practices include using strong passwords, enabling two-factor authentication, being cautious of suspicious links, and regularly updating your software. This section provides an overview of these best practices and how to implement them. Here’s a summary of key email security best practices:- Use Strong Passwords:
- Create strong, unique passwords for your email account and other online accounts.
- Use a combination of uppercase and lowercase letters, numbers, and symbols.
- Avoid using personal information, such as your name, birthday, or pet’s name.
- Use a password manager to securely store and manage your passwords.
- Enable Two-Factor Authentication (2FA):
- Enable 2FA for your email account and other online accounts that support it.
- 2FA adds an extra layer of security by requiring a second verification code in addition to your password.
- Common 2FA methods include using a mobile app (e.g., Microsoft Authenticator, Google Authenticator) or receiving a code via SMS.
- Be Cautious of Suspicious Links and Attachments:
- Avoid clicking links or opening attachments in emails from unknown or untrusted senders.
- Verify the sender’s email address and contact them through a separate channel (e.g., phone call) to confirm the legitimacy of the email.
- Hover over links to see the actual URL before clicking on them. Be wary of links that are shortened or redirect to unfamiliar websites.
- Scan attachments with a reputable antivirus program before opening them.
- Keep Your Software Up to Date:
- Regularly update your operating system, web browser, email client, and antivirus software.
- Software updates often include security patches that fix vulnerabilities that could be exploited by attackers.
- Enable automatic updates whenever possible to ensure that you’re always running the latest version of the software.
- Be Mindful of What You Share Online:
- Limit the amount of personal information you share online, especially on social media.
- Spammers and scammers can use this information to target you with personalized phishing attacks.
- Be careful about who you share your email address with. Avoid posting it publicly on websites or forums.
- Use a VPN (Virtual Private Network):
- When using public Wi-Fi networks, use a VPN to encrypt your internet traffic and protect your data from eavesdropping.
- Educate Yourself About Phishing and Scams:
- Stay informed about the latest phishing and scam tactics.
- Be aware of common red flags, such as urgent requests for personal information, grammatical errors, and suspicious links.
- Trust your instincts. If something seems too good to be true, it probably is.
- Go to the Microsoft account website.
- Sign in with your email address and password.
- Click on Security.
- Under “Advanced security options,” click Get started.
- Follow the on-screen instructions to set up two-factor authentication using a mobile app or phone number.
- Click the Start button.
- Go to Settings > Update & Security > Windows Update.
- Click Check for updates.
- Install any available updates.
- Open Outlook.
- Go to File > Office Account.
- Under “Product Information,” click Update Options > Update Now.
- LastPass
- 1Password
- Bitwarden
- Dashlane
| Method | Description | Advantages | Disadvantages |
|---|---|---|---|
| Outlook’s Built-in Spam Filter | Automatic filtering based on sender reputation, content, and formatting. | Easy to use, requires no configuration. | Can be inaccurate, may flag legitimate emails as spam. |
| Advanced Filtering Rules | Custom rules based on specific criteria (sender, subject, keywords). | Provides granular control over incoming emails. | Requires manual configuration and maintenance. |
| SPF, DKIM, and DMARC | Sender authentication technologies that verify the authenticity of email senders. | Significantly reduces email spoofing and improves deliverability. | Requires access to domain’s DNS settings. |
| Reporting and Blocking Spam | Manual reporting of spam emails and blocking of persistent senders. | Contributes to improving spam detection accuracy. | Requires manual effort. |
| Email Security Best Practices | Strong passwords, two-factor authentication, cautious handling of links/attachments. | Provides broad protection against various email threats. | Requires user awareness and diligence. |
Article Monster
Email marketing expert sharing insights about cold outreach, deliverability, and sales growth strategies.