Choosing the Right Spam Filtering Service for Your Exchange Environment
In today’s digital landscape, email remains a critical communication tool for businesses of all sizes. However, the relentless influx of spam, phishing attempts, and malware-laden emails poses a significant threat to productivity, security, and overall operational efficiency. Selecting the appropriate spam filtering service for your Exchange environment is therefore a crucial decision that requires careful consideration of various factors. This article will guide you through the essential aspects of evaluating and choosing a spam filtering service, ensuring your Exchange infrastructure remains protected and your users can focus on what matters most.
Table of Contents
- Understanding Spam Filtering Techniques and Technologies
- Evaluating Key Features and Functionality of Spam Filtering Services
- Integration and Deployment Strategies for Exchange
- Monitoring, Maintenance, and Optimization of Your Spam Filter
Understanding Spam Filtering Techniques and Technologies

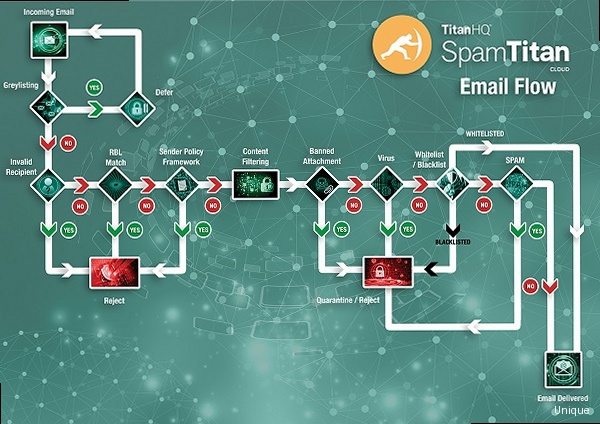
- Content Filtering: This technique analyzes the content of emails for suspicious keywords, phrases, and patterns commonly associated with spam.
- Heuristic Analysis: Heuristics involve applying a set of rules and algorithms to identify spam based on various characteristics, such as the email’s structure, headers, and sending behavior.
- Bayesian Filtering: This statistical approach learns from the content of both spam and legitimate emails to build a probability model that can accurately classify new messages.
- Sender Reputation: This method relies on tracking the reputation of email senders based on their past behavior. Senders with a history of sending spam are blacklisted or assigned a low reputation score.
- Real-time Blackhole Lists (RBLs): RBLs are publicly available lists of IP addresses known to be associated with spam activity. Spam filters use RBLs to block emails originating from these addresses.
- DNS-based Authentication of Named Entities (DANE): DANE allows domain owners to publish cryptographic keys in DNS records, which can be used to verify the authenticity of email senders.
- Sender Policy Framework (SPF): SPF is a DNS record that specifies which mail servers are authorized to send emails on behalf of a domain. This helps to prevent email spoofing and phishing attacks.
- DomainKeys Identified Mail (DKIM): DKIM adds a digital signature to outgoing emails, allowing recipients to verify that the message was actually sent by the claimed sender and that it hasn’t been tampered with during transit.
v=spf1 ip4:192.168.1.10 include:mailsender.com -allv=DKIM1; k=rsa; p=MIIBIjANBgkqhkiG9w0BAQEFAAOCAQ8AMIIBCgKCAQEAwJ6XqW6HwVd1L9b2x3z5y7a8b9c0d1e2f3g4h5i6j7k8l9m0n1o2p3q4r5s6t7u8v9w0x1y2z3a4b5c6d7e8f9g0h1i2j3k4l5m6n7o8p9q0r1s2t3u4v5w6x7y8z9a0b1c2d3e4f5g6h7i8j9k0l1m2n3o4p5q6r7s7t7u8v9w0x1y2z3a4b5c6d7e8f9g0h1i2j3k4l5m6n7o8p9q0r1s2t3u4v5w6x7y8z9a0b1c2d3e4f5g6h7i8j9k0l1m2n3o4p5q6r7sv=DKIM1; k=rsa; p=MIIBIjANBgkqhkiG9w0BAQEFAAOCAQ8AMIIBCgKCAQEAwJ6XqW6HwVd1L9b2x3z5y7a8b9c0d1e2f3g4h5i6j7k8l9m0n1o2p3q4r5s6t7u8v9w0x1y2z3a4b5c6d7e8f9g0h1i2j3k4l5m6n7o8p9q0r1s2t3u4v5w6x7y8z9a0b1c2d3e4f5g6h7i8j9k0l1m2n3o4p5q6r7sEvaluating Key Features and Functionality of Spam Filtering Services

- Accuracy: The most important feature of any spam filter is its accuracy. A good spam filter should be able to accurately identify and block spam emails while minimizing false positives (legitimate emails incorrectly marked as spam).
- Customization Options: The ability to customize the spam filter to meet your specific needs is crucial. Look for services that allow you to create custom rules, whitelists, and blacklists.
- Reporting Capabilities: Comprehensive reporting capabilities are essential for monitoring the performance of the spam filter and identifying trends. Look for services that provide detailed reports on spam volume, blocked emails, and false positives.
- Real-time Protection: The service should provide real-time protection against emerging spam threats. This includes the ability to quickly update its filters and block new spam campaigns.
- Email Quarantine: A good spam filter should provide a quarantine area where suspected spam emails are stored. This allows users to review quarantined emails and release any legitimate messages that were incorrectly marked as spam.
- Outbound Filtering: Outbound filtering helps to prevent your Exchange server from being used to send spam. This can protect your domain’s reputation and prevent it from being blacklisted.
- Virus Scanning: Many spam filtering services also include virus scanning capabilities. This can provide an additional layer of protection against malware-laden emails.
- Ease of Use: The spam filtering service should be easy to use and manage. Look for services with a user-friendly interface and comprehensive documentation.
- Integration with Exchange: The service should seamlessly integrate with your Exchange environment. This includes support for your Exchange version and the ability to easily configure the spam filter to work with your existing email infrastructure.
- Customer Support: Reliable customer support is essential in case you encounter any problems or have questions about the service.
# Add sender "john.doe@example.com" to the whitelist
Add-SpamFilterWhitelistSender -Sender "john.doe@example.com" -Description "Trusted vendor"# Enable outbound spam filtering for the Exchange server
Enable-SpamFilterOutbound -Server "ExchangeServer01" -Threshold 5# Generate a report showing the top 10 spam keywords
Get-SpamFilterReport -ReportType TopKeywords -Top 10 -StartDate "2023-10-26" -EndDate "2023-10-27"| Feature | Service A | Service B | Service C |
|---|---|---|---|
| Accuracy | High | Medium | High |
| Customization Options | Extensive | Limited | Moderate |
| Reporting Capabilities | Comprehensive | Basic | Detailed |
| Real-time Protection | Yes | Yes | Yes |
| Email Quarantine | Yes | Yes | Yes |
| Outbound Filtering | Yes | No | Yes |
| Virus Scanning | Yes | No | Yes |
| Ease of Use | Moderate | Easy | Moderate |
| Integration with Exchange | Excellent | Good | Excellent |
| Customer Support | 24/7 | Business Hours | 24/7 |
Integration and Deployment Strategies for Exchange
The integration and deployment of your chosen spam filtering service are critical steps that directly impact its effectiveness and your overall email infrastructure. Several deployment models are available, each with its own advantages and disadvantages. Careful planning and consideration of your specific environment are essential for a successful implementation. Here are the most common deployment strategies for spam filtering services in an Exchange environment:- Cloud-based Spam Filtering: This is the most popular deployment model, where the spam filtering service is hosted in the cloud and all email traffic is routed through the provider’s servers. This eliminates the need for on-premises hardware and software, and it simplifies management.
- On-premises Spam Filtering: In this model, the spam filtering software is installed directly on your Exchange server or on a dedicated server within your network. This gives you more control over the filtering process, but it also requires more resources and expertise to manage.
- Hybrid Spam Filtering: This is a combination of cloud-based and on-premises filtering. For example, you might use a cloud-based service to filter inbound email and an on-premises solution to filter outbound email.
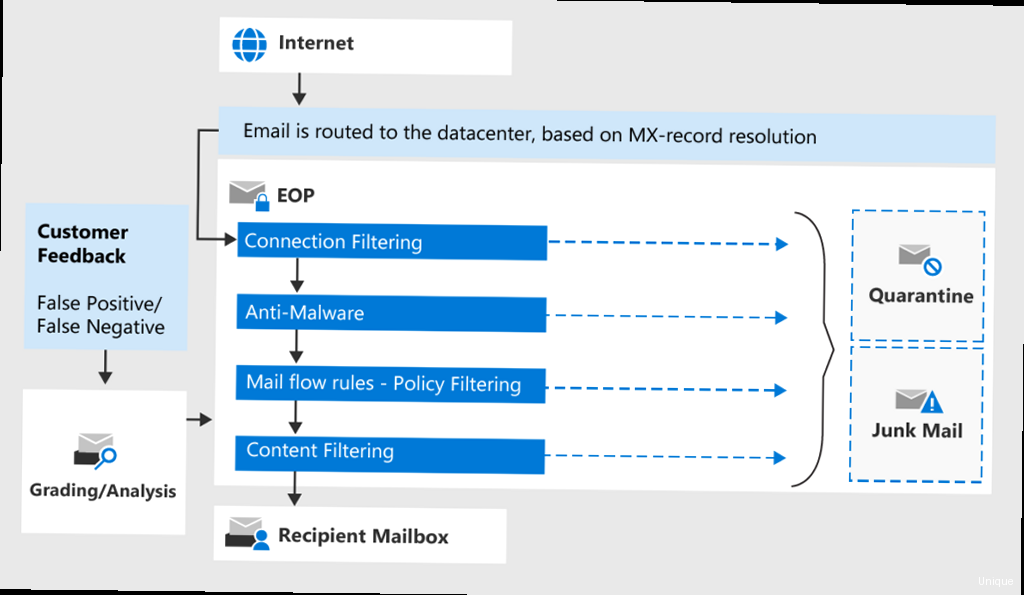
- Exchange Online Protection (EOP): If you’re using Exchange Online or a hybrid Exchange environment, you already have access to EOP, which is Microsoft’s built-in spam filtering service. EOP provides basic spam filtering capabilities, but you may need to supplement it with a third-party service for more advanced protection.
MX Record 1:
Hostname: mx1.spamfilterprovider.com
Priority: 10

MX Record 2:
Hostname: mx2.spamfilterprovider.com
Priority: 20Install-TransportAgent -Name "SpamFilterAgent" -TransportAgentFactory "SpamFilter.TransportAgentFactory" -AssemblyPath "C:\Program Files\SpamFilter\SpamFilter.dll"Set-HostedContentFilterPolicy -Identity "Default" -SCLJunkThreshold 5Monitoring, Maintenance, and Optimization of Your Spam Filter
Once your spam filtering service is deployed, it’s crucial to continuously monitor its performance, perform regular maintenance, and optimize its configuration. This ensures that the service remains effective in protecting your Exchange environment from evolving spam threats and minimizes disruptions to legitimate email communication. Here are some key aspects of monitoring, maintenance, and optimization:- Regularly Reviewing Spam Filter Reports: Analyze reports to identify trends in spam activity, assess the accuracy of the filter, and identify potential false positives.
- Adjusting Filter Settings Based on Performance: Fine-tune the filter’s sensitivity, SCL thresholds, and custom rules to optimize its performance based on the observed spam trends and false positive rates.
- Updating Whitelists and Blacklists: Maintain accurate whitelists of trusted senders and blacklists of known spammers to prevent legitimate emails from being blocked and to block unwanted emails more effectively.
- Monitoring System Health and Performance: Monitor the health and performance of the spam filtering service to ensure that it’s running smoothly and efficiently. This includes monitoring CPU usage, memory usage, and disk space.
- Staying Up-to-Date with the Latest Spam Threats: Keep abreast of the latest spam techniques and trends to ensure that your spam filter is equipped to handle emerging threats.
- Regularly Testing the Spam Filter: Send test emails containing known spam characteristics to verify that the filter is working correctly.
- Reviewing Quarantine Activity: Regularly review the quarantine area to identify and release any legitimate emails that were incorrectly marked as spam.
- Performing Software Updates: Keep your spam filtering software up-to-date with the latest security patches and bug fixes.
# Create an alert for high spam volume
New-SpamFilterAlert -Name "HighSpamVolume" -Threshold 1000 -Interval 60 -Action SendEmail -EmailAddress "admin@example.com" -EventType SpamDetected -Description "Alert when spam volume exceeds 1000 emails per hour"

# Create an alert for high false positive rate
New-SpamFilterAlert -Name "HighFalsePositiveRate" -Threshold 5 -Interval 60 -Action SendEmail -EmailAddress "admin@example.com" -EventType FalsePositive -Description "Alert when false positive rate exceeds 5% per hour"# Pseudocode for automated whitelist updates
OnUserReleasesEmailFromQuarantine:
GetSenderEmailAddress()
CheckIfSenderIsAlreadyInWhitelist()
If (SenderIsNotInWhitelist):
AddSenderToWhitelist("User released from quarantine")
LogEvent("Sender added to whitelist based on user feedback")
Else:
LogEvent("Sender already in whitelist")# Connect to Exchange Online PowerShell
Connect-ExchangeOnline
# Get a list of quarantined emails
$Quarantine = Get-QuarantineMessage
# Review the quarantined emails
$Quarantine | Format-Table SenderAddress, Subject, ReceivedTime
# Release a specific email from quarantine
Release-QuarantineMessage -Identity "MessageID" -ReleaseToAll -Comment "Released by administrator - legitimate email"Article Monster
Email marketing expert sharing insights about cold outreach, deliverability, and sales growth strategies.