How to Grow Chives from Seed
Chives are a versatile and delicious herb that is easy to grow from seed. Whether you are a seasoned gardener or a beginner, chives are a great addition to any garden. In this article, we will discuss the steps needed to successfully grow chives from seed.
Step 1: Choosing the Right Seeds
When choosing chive seeds, it is important to select organic, non-GMO seeds from a reputable supplier. This will ensure that your chives are healthy and free from harmful chemicals. You can find chive seeds at your local garden center or order them online.
Step 2: Preparing the Soil
Chives prefer well-drained, fertile soil. Before planting your seeds, make sure to prepare the soil by loosening it with a garden fork and adding compost or aged manure to improve fertility. Chives thrive in slightly alkaline soil with a pH of 6.0 to 7.0.
Step 3: Planting the Seeds
Chives can be started indoors 6-8 weeks before the last frost date or directly sown in the garden in early spring. Sow the seeds thinly on the surface of moist soil and cover them lightly with a thin layer of soil. Keep the soil consistently moist until the seeds germinate.
Step 4: Caring for Chive Seedlings
Once the chive seeds germinate, thin the seedlings to allow for proper spacing. Chives require at least 6 inches of space between plants to thrive. Water the seedlings regularly, keeping the soil moist but not waterlogged. Fertilize the plants with a balanced fertilizer every 4-6 weeks.
Step 5: Harvesting Chives
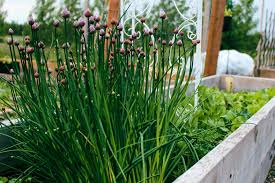
Chives can be harvested once the plants reach 6-8 inches in height. To harvest chives, use scissors to snip off the leaves at the base of the plant. This will encourage new growth and ensure a continuous harvest throughout the growing season. Chives can be used fresh or dried for later use.
Step 6: Overwintering Chives
In colder climates, chives can be overwintered by mulching the plants with straw or leaves to protect them from freezing temperatures. In warmer climates, chives may remain green throughout the winter. Cut back the plants in early spring to encourage new growth.
Step 7: Troubleshooting Common Problems
If your chive plants are not growing well, check for signs of pests or diseases. Aphids and thrips are common pests that can affect chives. To prevent pests, keep the garden clean and remove any debris that may harbor insects. If diseases are present, treat them with an organic fungicide.
Step 8: Enjoying Your Homegrown Chives
Once you have successfully grown chives from seed, you can enjoy the fresh, flavorful taste of this versatile herb in your cooking. Chives can be used in a variety of dishes, including salads, soups, and omelets. Get creative and experiment with different ways to incorporate chives into your favorite recipes!
With these simple steps, you can grow chives from seed and enjoy the benefits of having fresh herbs at your fingertips. Happy gardening!